

Several companies and websites have reported immense growth in engagements after shifting to PWAs. Since user experience matters more than anything these days, typical websites face high competition from native apps. Websites are not as fast and user-friendly as native apps. Progressive Web App development methodology tries to fill this user experience gap by transforming web apps into native-like apps, and they are proving to be quite successful at it.
Developing a simple PWA for a website isn’t a difficult task at all for someone who knows the basics of web app development. If the PWA prerequisites are met, you’ll be able to publish a basic PWA in less than two weeks. However, developing a fast, reliable, and user-friendly PWA with complex features needs more time and expertise in different aspects of web app development and user experience.
We have discussed the pros and cons of PWAs here, and explained when you should think about developing your own PWA here. In this article, we go even further and get more technical to give you a better understanding of how developers build PWAs.
What do I need to develop a PWA? What are the prerequisites?
PWAs are simply websites that feel and perform like native apps. Like any other web app development technology, PWAs also have specific requirements; browsers won’t let your users install the PWA if you fail to meet all the PWA prerequisites. Here’s what you need to publish your own progressive web app:
A secure connection
Progressive Web Apps can access location and usage data more effectively than typical websites. A critical PWA element, the service worker, works in the background to enable push notifications, sync, and other tasks. This consistent access to the device functionalities raises a serious security question: what if spammy websites use PWAs to steal personal information? Note that PWAs are published through websites and do not have platforms like App Store or Play Store to ensure authenticity and security.
Browsers only accept PWAs from secure (HTTPS) websites to avoid such issues and better protect user data. Yet, it still isn’t enough to block spammy PWAs, that’s why browsers like Safari do not display the install prompt. Securing your website with HTTPS endpoints allows the service worker to transfer data securely on behalf of your app.
A standard manifest.json file
Your PWA must have a standard W3C manifest.json file that outlines your PWA's user interface and behavior, including the icon, splash screen, images, languages, and the start page. This file determines what the users should see when they open the app, as well as the overall styling of the app.
It should be network-independent
The whole point of PWAs is to provide a native-like experience for web-based applications, and it won’t be complete without an offline experience. Your PWA should have a mechanism to control traffic and content when the device is offline. The app should be able to work with cache or offline content when there is no internet connection.
It should be responsive
Your users will access your website through different devices with different viewport sizes, so it is important to make the content visible and readable for all of the users. If your PWA isn’t responsive, users will see the desktop website on smartphones and have a hard time finding the information they’re looking for.
It should be cross-browser compatible
PWA technology is still under development, so there are compatibility issues with some browsers like Safari and Mozilla. They all support basic PWAs, but only a few support push notifications and install prompt notifications. When developing your PWA, make sure that all the features you’re including are compatible with all browsers. Otherwise, your app may not be accessible for a large chunk of your audience.
Should use deep links
Each page of your website should have a unique link, called a deep link. Deep links allow you to send users directly to the PWA instead of your website so that they experience a better interface and performance than they would have if they had accessed it through a browser.
How to create a PWA?
So how do you create your own PWA? If you’re using WordPress as your backend, you can use plugins like PWA or SuperPWA to convert your website into a PWA in just a few clicks. However, please note that these plugins create a basic PWA, and you may not get all the features and may not be able to customize it as per your needs.
Let’s see how you can build a simple PWA for your website in six easy steps.
Serve your website over HTTPS
As mentioned earlier, HTTPS is the standard for PWAs. Browsers do not support non-HTTPS websites anymore, and a valid SSL certificate is the first thing you need to get started. Most non-spammy websites today have an SSL certificate.
Create an application shell
The app shell is the minimal HTML, CSS, and JavaScript needed to launch the app; it also determines the first thing users see when the app loads. It should exist entirely in your index.html document with inline CSS and JavaScript to make sure your app loads as fast as it can.
The index.html file should be designed to make content visible as soon as possible. You can implement progressive enhancement to improve the performance—display content as quickly as possible and then progressively enhance it as more resources are loaded.
Here’s an example of the index.html file for your reference:
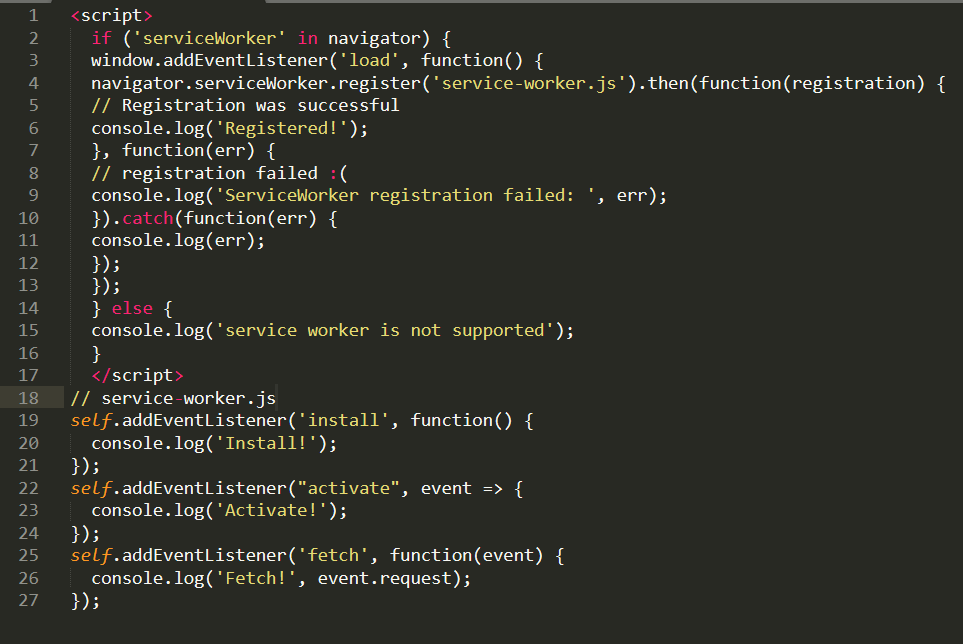
Develop a service worker
The service worker is what makes PWAs more appealing to web admins. It brings the engagement-specific features of native apps into PWAs, including push notifications, caching, and install prompts.
However, if you don’t need these features, you can keep your serviceworker.js file blank, and your app will still be usable. On the other hand, some web browsers do not support service workers. If most of your audience uses a browser that doesn’t support service workers, it is better to leave it blank.
A service worker has three lifecycle events. The first one is the ‘install’ event that triggers when the user first visits your page. The second one is ‘activate’ which triggers right before the completion of registration, and the third ‘fetch’ triggers when the app makes the first network request. The ‘fetch’ request brings offline capabilities like caching into the PWA.
Here’s an example service worker file:
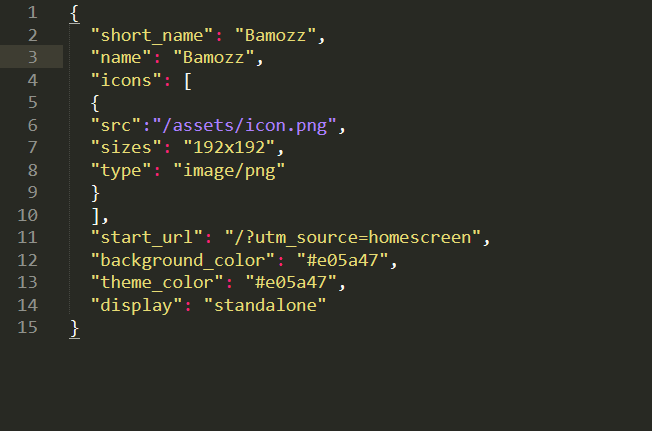
Add a web app manifest.
The web app manifest file makes the PWA installable by outlining the offline elements of the app such as the icon, splash screen, images, start screen, and languages. You need to add the manifest.json file into the app’s root directory to make it installable.
The manifest.json file controls all the appearance aspects of the app. You can display or hide the URL bar and change the color of the status bar by editing the manifest.json file.
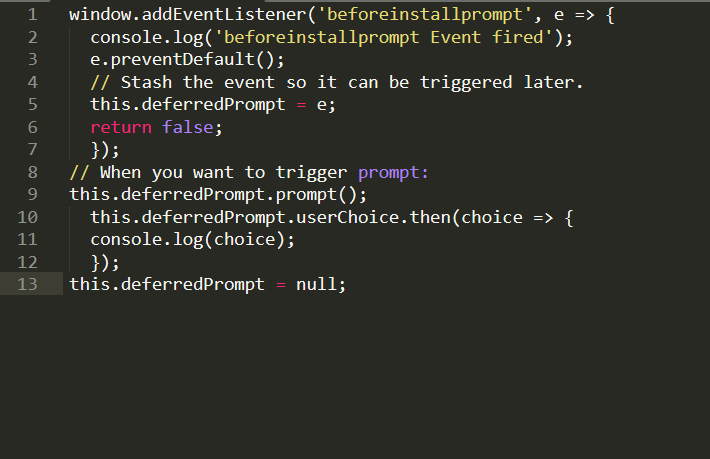
Configure the install prompt
Most browsers, especially chrome, will prompt the users to install the PWA if it has both a service worker and a web app manifest. However, the user has to visit the website twice within five minutes to get the install prompt.
But you can code your app to show the install prompt when the user takes a certain action. You can intercept the beforeinstallprompt, save it for later, and then deploy the prompt when you see fit—when a user downloads a file or fills out a form.
Analyze your app performance
Performance is at the core of PWAs, and if your app isn’t fast, it’s not good enough to provide a native-like experience. Users should be able to access the content seamlessly regardless of network conditions.
You can use Google’s RAIL guidelines to measure your app's performance. RAIL is a user-centric performance model, where R stands for Response (how long your app takes to respond to user actions), A stands for Animations (animation speed of 60fps), I stands for Idle (using idle time to cache and load more data), and L for Load (loads within one second).
You can also run a Lighthouse performance test to see how your app performs. Lighthouse is a Chrome Developer Tool you can find as a tab in More tools→Developer Tools on the Chrome browser. The tool runs your PWA under different conditions, measures its performance, and checks whether it complies with PWA guidelines.
Final thoughts
We understand that this article is a bit more technical, but for those who are interested in the technicalities, it should be enough to give you a clear idea about the development of PWAs. Please note that you can only create a basic PWA with the above guide, and developing a great PWA with features such as push notifications requires a lot more time, effort, and expertise.
In short, to launch a simple PWA, you only need a secure connection, a manifest.json file, and a service worker. You can even launch a simple PWA now and add other functionalities later!


